

Interested in getting early access to the Data Security feature? Contact support@cdata.com.
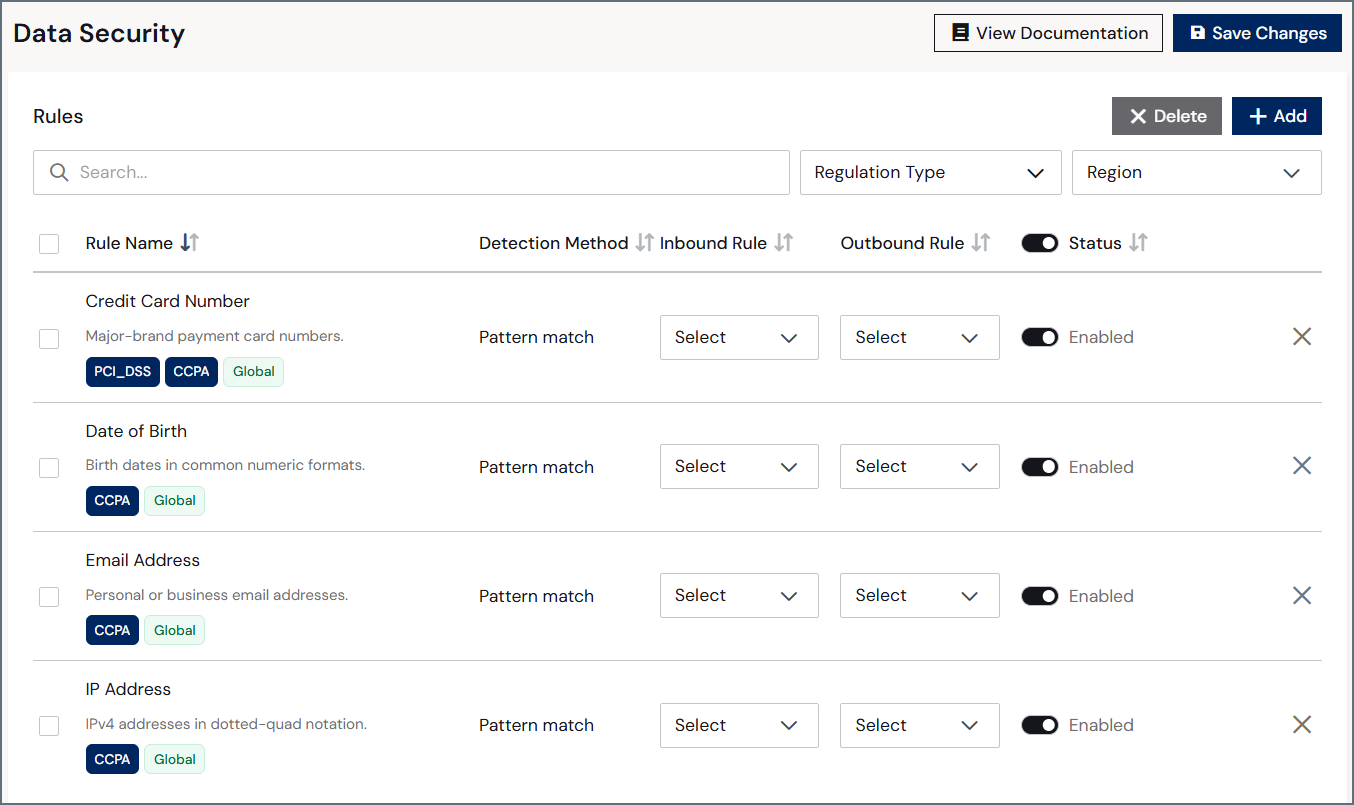
- Rule Name–the name of the preset category, or in the case of custom rules, the user-defined name of the rule. This column also displays a short description of the rule and its regulation/region tag(s). The regulation tags indicate the compliance regulations it helps address (for example, CCPA / CPRA, GLBA, PCI DSS, and HIPAA). The region tags indicate where the regulation applies (for example, Global and US).
- Detection Method–how the rule identifies a match. Preset rules use Pattern match (a built-in pattern for a known data type), while custom rules use Regex, where you provide your own regular expression and optionally a confidence score.
- Inbound Rule–the action applied to matching data coming into the system.
- None–takes no action on matching data. The rule still detects the match, but the data passes through unchanged.
- Warn–passes the matching data through unchanged, exactly as None does, but records the match in the logs for review.
- Redact–masks or removes the matching sensitive values before the data enters the system, while allowing the rest of the data through.
- Block–prevents data containing a match from entering the system.
- Outbound Rule–the same actions applied to matching data leaving the system: None, Warn, Redact, or Block.
- Status–whether the rule is Enabled or Disabled.
- Rule Actions–the icons in the last column represent the various actions you can perform on a security rule.
- Edit (🖉)–edit the selected security rule (custom rules only).
- Delete (🗙)–delete the selected security rule.
How Redact and Block behave: When you apply Redact, each matching value is replaced in place while the rest of the data is returned unchanged. On outbound data, text, numeric, and date values are redacted. Text values are redacted to XXXX, numeric values are redacted to 0, and date values are redacted to 1900-01-01. When there is a date in a varchar type column and a redact rule is set, the date is converted to a redacted datetime format (1900-01-01) rather than a redacted text format (XXXX).When you apply Block, a match stops the operation. An inbound match halts the query and returns an error to the caller, and an outbound match prevents the matching results from being returned.
Filtering
The section above the Rules table allows you to filter by rule name, regulation type, and/or region. Use the Regulation Type and Region filters to filter by specific tags.Add a Rule
You can add a rule from preset categories, or add a custom rule.Add a Preset Rule
To add a preset rule:1
On the main Data Security page, click Add. The Add Rule dialog appears.
2
Click Preset Categories.
3
Either click a preset rule type (such as PCI DSS) or click I don’t know my type — show me all, then click Next.
4
Search by Name, Regulation Type, or Region for the rule. Select one or more rules to add. Select the checkbox next to Entity to select all.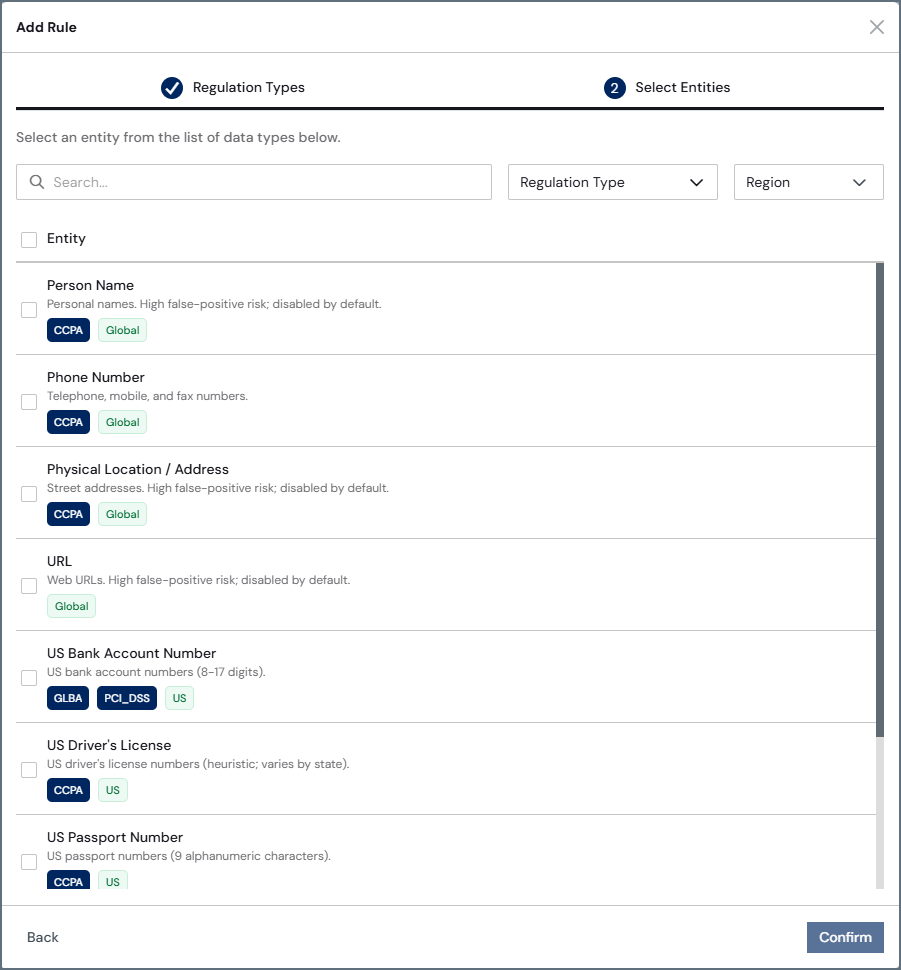
5
Click Confirm.
6
The rules are added as Enabled. Configure each rule by setting its Inbound Rule and Outbound Rule. To hold a rule before using it, toggle Enabled off.
7
Click Save Changes to save the added rules.
Add a Custom Rule
To add a custom rule:1
On the main Data Security page, click Add. The Add Rule dialog appears.
2
Click Custom Rule.
3
In the Add Rule dialog, enter the following: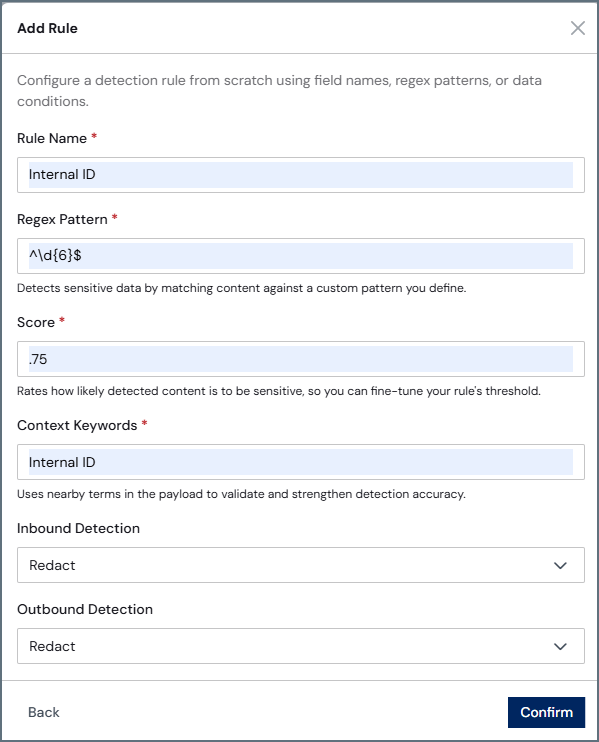
- Rule Name–the user-defined name of the rule.
- Regex Pattern–the regular expression used to identify a match for this rule. For example, to validate a US ZIP code, matching both five-digit and nine-digit formats, would be
^\d{5}(?:-\d{4})?$. - Score–(optional) the confidence score, between 0.0 and 1.0, that determines how the rule evaluates a regex match. At 0.8 or above, the pattern match alone is sufficient to trigger the rule. Below 0.8, the rule triggers only when context keywords are also found in the data. A Score below 0.8 requires one or more Context Keywords to be present in the data.
- Context Keywords–case-insensitive keywords that help refine detection and reduce false positives. The system looks for context keywords in the table name, column name, column label, or cell of the table. In the ZIP code example, you can add context keywords such as zip_code, zip code, and zipcode to ensure you are redacting a ZIP code and not another type of code. Required when Score is below 0.8; optional when Score is 0.8 or above, as the pattern match alone is sufficient. If context keywords are provided, a Score must also be set.
- Inbound Detection–the action applied to matching data coming into the system: None, Warn, Redact, or Block.
- Outbound Detection–the same actions applied to matching data leaving the system: None, Warn, Redact, or Block.
4
Click Confirm.
5
The rule is added as Enabled. To hold a rule before using it, toggle Enabled off.
6
You can edit the Inbound Rule, Outbound Rule, and Status on the main page. To edit the Rule Name, Regex Pattern, Score, or Context Keywords, click the Edit (🖉) button.
7
Click Save Changes to save the rules on the Data Security page.