> ## Documentation Index
> Fetch the complete documentation index at: https://docs.cloud.cdata.com/llms.txt
> Use this file to discover all available pages before exploring further.
# Quick Start Guide
> Connect AI Embed is a way for customers to integrate Connect AI live data access capabilities for their end users within their own applications.
Contact CData sales if you are interested in a Connect AI Embed account.
Connect AI Embed uses a two-level account structure:
* **Parent Account**—Created by CData for your organization. As the ISV, you use the parent account to manage your entire Connect AI Embed deployment, including creating, viewing, and monitoring sub-accounts through the Connect AI Embed interface or API.
* **Sub-Account**—One sub-account is created for each of your customers. Within a sub-account, end users can connect to data sources and query data. The access privileges you grant determine what each end user can create, edit, or delete.
The Connect AI Embed **Accounts** page contains the sub-account names, external Id, and account Ids for reference.
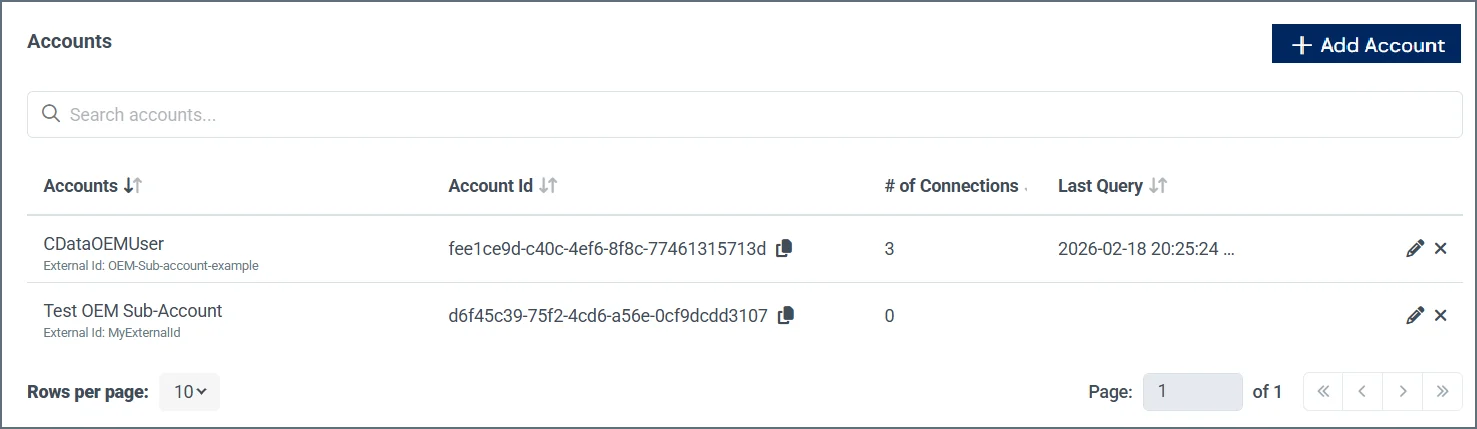 Click the edit icon to change the account name or external Id.
Click the delete icon to delete the sub-account.
## Connect AI Embed Quick Start
The following is an overview of setting up Connect AI Embed. There are five main steps.
### Step 1: Create a Parent Account
CData sets up a parent account for you and sends you the account information, including the account name and account Id.
The administrator of the Connect AI Embed parent account [creates a JSON Web Token (JWT)](/en/API/Authentication-Embedded), which consists of a private key and a corresponding public key. The private key must be stored according to the security requirements of the product integrated with Connect AI Embed.
The administrator provides the public key certificate in Privacy-Enhanced Mail (PEM) format to register the management account. They can register the public key by opening a support ticket with Connect AI.
Once registered, the administrator of the parent account can sign in to the account. Please accept the terms of service.
The parent account's administrator creates and manages the sub-accounts.
### Step 2: Create a Sub-Account
Once you have created the parent account, you can create the sub-accounts in one of two ways:
* In the **Accounts** page, click **+Add account**. Enter the **Account Name** and **External ID** of the sub-account, and click **Confirm**.
* Use [Create Account](/en/API/Account-API) in the [Connect AI Embed API](/en/API/REST-API-Embedded) to create a sub-account. You must supply the JWT that you created in [Create a Parent Account](#step-1:-create-a-parent-account), as well as the External ID of the sub-account.
### Step 3: Configure Connection Settings (Optional)
Connect AI Embed gives you two ways to configure connection settings centrally across your sub-accounts.
* Connection Overrides: Configure a connection setting once at the parent account level and push it to all sub-accounts automatically. This eliminates per-tenant maintenance as you scale. See the [Sources](/en/Settings-Embedded#sources) section in the **Settings** documentation for configuration steps.
* Branded OAuth Apps: Register your own OAuth application with data source providers so your customers authenticate under your brand rather than CData's. When a sub-account user connects Salesforce or another OAuth source, they see your application name—not CData's. See the [Sources](/en/Settings-Embedded#sources) section in the **Settings** documentation for configuration steps.
The existing Custom Overrides feature described below also remains available for other connection property overrides.
Custom overrides allow end users to log in with their own organization's OAuth credentials rather than CData credentials. To add connection overrides, follow these steps:
In the **Sources** tab of the **Settings** page, click **+Add Override**.
Search for the data source to override. Click **Next**.
Select the **Setting** to override.
Enter the **Override Value**.
Select whether the value should apply to new connections only or to all connections (new and existing).
Click **Confirm**.
End users can now use the custom credentials.
### Step 4: Configure a Connection
An end user of the sub-account clicks **Add Connection** on your web page. On the backend, your web site calls [Create Connection](/en/API/Connection-API), which generates a redirect URL to the Connect AI Embed web page. The end user can then configure a connection of a certain type, such as a Salesforce connection, and save and test the connection. When the end user is finished, Connect AI Embed redirects them back to your web page, which contains a list of connections. See [Connection Flow](/en/Connection-Flow) for more details.
### Step 5: Query the Data Using AI
Once your data source is connected, your application can use AI to interact with end-user data in natural language. Connect AI Embed's MCP server bridges your AI agent and your customers' connected accounts (such as Jira or Salesforce). Each sub-account's connections are isolated—AI workflows for one sub-account cannot access another's data. A JWT containing a `connection_ids` claim, generated by your server, scopes each request to the correct end user. See [MCP](/en/API/MCP-Embedded) for more information.
You can also use one of the following Connect AI drivers to query the data:
* [ADO.NET](/en/Clients/ADO.NET-Client-Embedded)
* [ODBC](/en/Clients/ODBC-Client-Embedded)
* [JDBC](/en/Clients/JDBC-Client-Embedded)
* [Python](/en/Clients/Python-Client-Embedded)
In addition, Connect AI Embed provides a full-featured [REST API](/en/API/REST-API-Embedded). You can query data directly with any REST-compatible application or integration tool capable of creating HTTP requests.
### View Logs
Use the [**Logs**](/en/Logs-Embedded) page or the [Log API](/en/API/Log-API-Embedded) to view and download a list of logs for a Connect AI Embed account.
Click the edit icon to change the account name or external Id.
Click the delete icon to delete the sub-account.
## Connect AI Embed Quick Start
The following is an overview of setting up Connect AI Embed. There are five main steps.
### Step 1: Create a Parent Account
CData sets up a parent account for you and sends you the account information, including the account name and account Id.
The administrator of the Connect AI Embed parent account [creates a JSON Web Token (JWT)](/en/API/Authentication-Embedded), which consists of a private key and a corresponding public key. The private key must be stored according to the security requirements of the product integrated with Connect AI Embed.
The administrator provides the public key certificate in Privacy-Enhanced Mail (PEM) format to register the management account. They can register the public key by opening a support ticket with Connect AI.
Once registered, the administrator of the parent account can sign in to the account. Please accept the terms of service.
The parent account's administrator creates and manages the sub-accounts.
### Step 2: Create a Sub-Account
Once you have created the parent account, you can create the sub-accounts in one of two ways:
* In the **Accounts** page, click **+Add account**. Enter the **Account Name** and **External ID** of the sub-account, and click **Confirm**.
* Use [Create Account](/en/API/Account-API) in the [Connect AI Embed API](/en/API/REST-API-Embedded) to create a sub-account. You must supply the JWT that you created in [Create a Parent Account](#step-1:-create-a-parent-account), as well as the External ID of the sub-account.
### Step 3: Configure Connection Settings (Optional)
Connect AI Embed gives you two ways to configure connection settings centrally across your sub-accounts.
* Connection Overrides: Configure a connection setting once at the parent account level and push it to all sub-accounts automatically. This eliminates per-tenant maintenance as you scale. See the [Sources](/en/Settings-Embedded#sources) section in the **Settings** documentation for configuration steps.
* Branded OAuth Apps: Register your own OAuth application with data source providers so your customers authenticate under your brand rather than CData's. When a sub-account user connects Salesforce or another OAuth source, they see your application name—not CData's. See the [Sources](/en/Settings-Embedded#sources) section in the **Settings** documentation for configuration steps.
The existing Custom Overrides feature described below also remains available for other connection property overrides.
Custom overrides allow end users to log in with their own organization's OAuth credentials rather than CData credentials. To add connection overrides, follow these steps:
In the **Sources** tab of the **Settings** page, click **+Add Override**.
Search for the data source to override. Click **Next**.
Select the **Setting** to override.
Enter the **Override Value**.
Select whether the value should apply to new connections only or to all connections (new and existing).
Click **Confirm**.
End users can now use the custom credentials.
### Step 4: Configure a Connection
An end user of the sub-account clicks **Add Connection** on your web page. On the backend, your web site calls [Create Connection](/en/API/Connection-API), which generates a redirect URL to the Connect AI Embed web page. The end user can then configure a connection of a certain type, such as a Salesforce connection, and save and test the connection. When the end user is finished, Connect AI Embed redirects them back to your web page, which contains a list of connections. See [Connection Flow](/en/Connection-Flow) for more details.
### Step 5: Query the Data Using AI
Once your data source is connected, your application can use AI to interact with end-user data in natural language. Connect AI Embed's MCP server bridges your AI agent and your customers' connected accounts (such as Jira or Salesforce). Each sub-account's connections are isolated—AI workflows for one sub-account cannot access another's data. A JWT containing a `connection_ids` claim, generated by your server, scopes each request to the correct end user. See [MCP](/en/API/MCP-Embedded) for more information.
You can also use one of the following Connect AI drivers to query the data:
* [ADO.NET](/en/Clients/ADO.NET-Client-Embedded)
* [ODBC](/en/Clients/ODBC-Client-Embedded)
* [JDBC](/en/Clients/JDBC-Client-Embedded)
* [Python](/en/Clients/Python-Client-Embedded)
In addition, Connect AI Embed provides a full-featured [REST API](/en/API/REST-API-Embedded). You can query data directly with any REST-compatible application or integration tool capable of creating HTTP requests.
### View Logs
Use the [**Logs**](/en/Logs-Embedded) page or the [Log API](/en/API/Log-API-Embedded) to view and download a list of logs for a Connect AI Embed account.