> ## Documentation Index
> Fetch the complete documentation index at: https://docs.cloud.cdata.com/llms.txt
> Use this file to discover all available pages before exploring further.
# Microsoft Power Apps
> You can connect Microsoft Power Apps to Connect AI via the OpenAPI specification or via the Virtual SQL Server API.
## Prerequisites for Connecting via OpenAPI
Before you connect via OpenAPI, you must first do the following:
* Connect a data source to your Connect AI account. See [Sources](/en/Sources) for more information.
* [Add a workspace](/en/Workspaces#add-a-workspace) to Workspaces.
* [Add assets](/en/Workspaces#workspace-assets) to your workspace.
* Generate a Personal Access Token (PAT) on the [Settings](/en/Settings#personal-access-tokens) page. Copy this down, as it acts as your password during authentication.
## Connect via OpenAPI
To establish a connection from Microsoft Power Apps to Connect AI via OpenAPI, follow these steps.
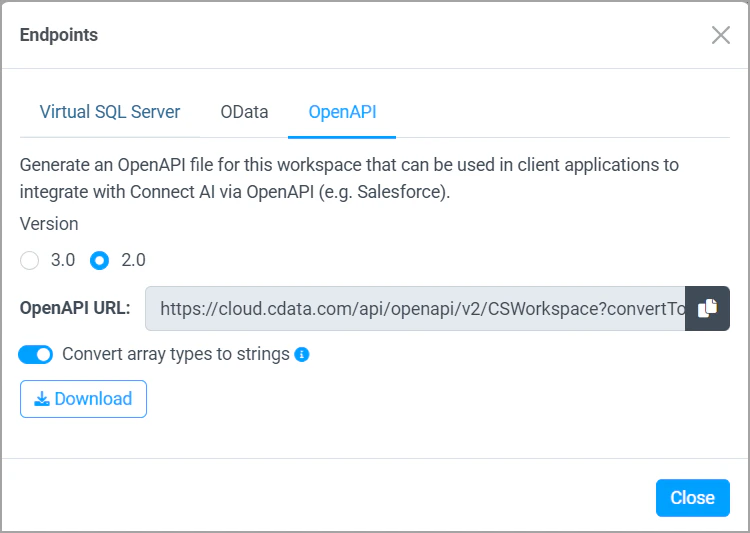
In **Workspaces** in Connect AI, select a workspace and download the OpenAPI specification for the workspace. See [OpenAPI](/en/API/OpenAPI) for more information.
You must use OpenAPI version 2.0 and select **Convert array types to strings**.
 Log in to Microsoft Power Apps.
Select **Custom connectors** to create a custom connector (you may need to click **Discover all** to find **Custom connectors**).
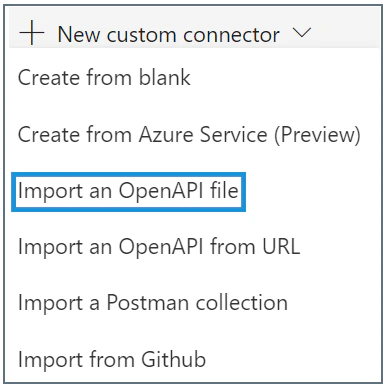
Select **New custom connector** > **Import an OpenAPI file**.
Log in to Microsoft Power Apps.
Select **Custom connectors** to create a custom connector (you may need to click **Discover all** to find **Custom connectors**).
Select **New custom connector** > **Import an OpenAPI file**.
 Enter a **Connector name** and import the OpenAPI specification file you downloaded.
In the **1. General** step, enter general information about the connector, including a description. **Host** and **Base URL** are required, but are already filled in.
In the **2. Security** step, select an **Authentication type** of **Basic authentication**. Users have to provide a user name and password before using this API. Enter the parameter labels that users will see.
When you use the custom connector, the user name is the Connect AI user name, and the password is the PAT created in the prerequisites.
The **3. Definition** step of the connector defines all the actions of the connector that are contained in the OpenAPI specification file. The actions include all the functions you need for the table, including list, get, create, update, and delete records.
In the **3. Definition** step, you can edit the **Actions**, **References**, and **Policies** imported from the OpenAPI specification.
* **Actions**—each action in the custom connector has **General** information, as well as the **Request**, **Response**, and **Validation** of the response.
For example, the following request is a GET request to list drives.
Enter a **Connector name** and import the OpenAPI specification file you downloaded.
In the **1. General** step, enter general information about the connector, including a description. **Host** and **Base URL** are required, but are already filled in.
In the **2. Security** step, select an **Authentication type** of **Basic authentication**. Users have to provide a user name and password before using this API. Enter the parameter labels that users will see.
When you use the custom connector, the user name is the Connect AI user name, and the password is the PAT created in the prerequisites.
The **3. Definition** step of the connector defines all the actions of the connector that are contained in the OpenAPI specification file. The actions include all the functions you need for the table, including list, get, create, update, and delete records.
In the **3. Definition** step, you can edit the **Actions**, **References**, and **Policies** imported from the OpenAPI specification.
* **Actions**—each action in the custom connector has **General** information, as well as the **Request**, **Response**, and **Validation** of the response.
For example, the following request is a GET request to list drives.
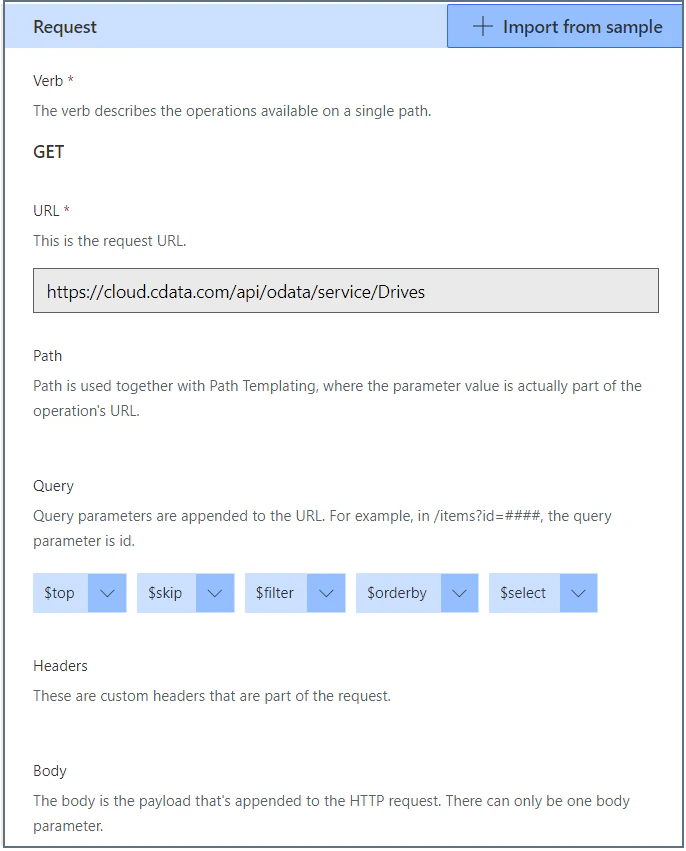 The request includes query parameters that are appended to the URL, such as `$top`, `$filter`, and `$orderby`. You can edit and delete the query parameters here. The parameters are based on the OData protocol.
See [API Operations](/en/API/OpenAPI#api-operations) for a complete reference.
The **Test** step of creating a custom connector is where you can test out the query parameters.
Similarly, there is a POST request to create a new record. The request contains all the fields for the record. You can edit these fields in the definition.
* **References**—reusable parameters that are used by both actions and triggers. Each reference has a **Definition** and **Validation**.
* **Policies**—used to change the behavior of actions through configuration.
Save the custom connector.
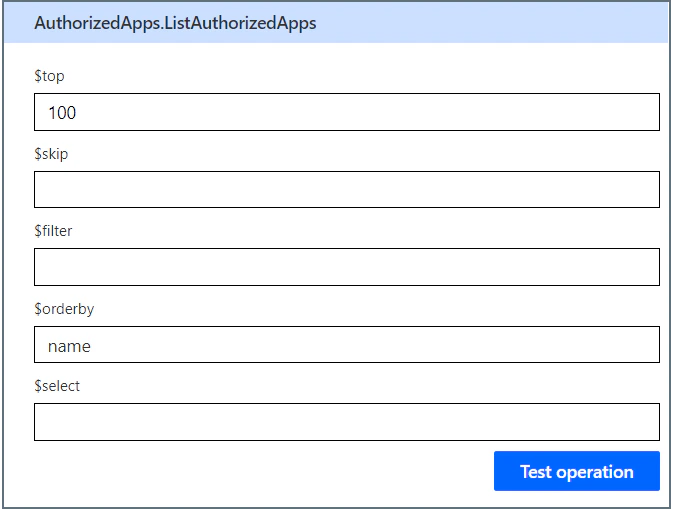
In the **6. Test** step, you can test the behavior of each operation defined in the OpenAPI specification by applying query parameters.
For example, you can test the `$top` and `$orderby` query parameters by returning the top 100 records, ordered by `name`.
The request includes query parameters that are appended to the URL, such as `$top`, `$filter`, and `$orderby`. You can edit and delete the query parameters here. The parameters are based on the OData protocol.
See [API Operations](/en/API/OpenAPI#api-operations) for a complete reference.
The **Test** step of creating a custom connector is where you can test out the query parameters.
Similarly, there is a POST request to create a new record. The request contains all the fields for the record. You can edit these fields in the definition.
* **References**—reusable parameters that are used by both actions and triggers. Each reference has a **Definition** and **Validation**.
* **Policies**—used to change the behavior of actions through configuration.
Save the custom connector.
In the **6. Test** step, you can test the behavior of each operation defined in the OpenAPI specification by applying query parameters.
For example, you can test the `$top` and `$orderby` query parameters by returning the top 100 records, ordered by `name`.
 You can now build apps with your custom connector.
## Prerequisites for Connecting via Virtual SQL Server API
Before you connect via the Virtual SQL Server API, you must first do the following:
* Connect a data source to your Connect AI account. See [Sources](/en/Sources) for more information.
* If you want to connect to a Connect AI workspace, [add a workspace](/en/Workspaces#add-a-workspace) to Workspaces and [add assets](/en/Workspaces#workspace-assets) to your workspace.
* Generate a Personal Access Token (PAT) on the [Settings](/en/Settings#personal-access-tokens) page. Copy this down, as it acts as your password during authentication.
## Connect via the Virtual SQL Server API
To establish a connection from Microsoft Power Apps to the Connect AI Virtual SQL Server API, follow these steps.
Log in to Microsoft Power Apps.
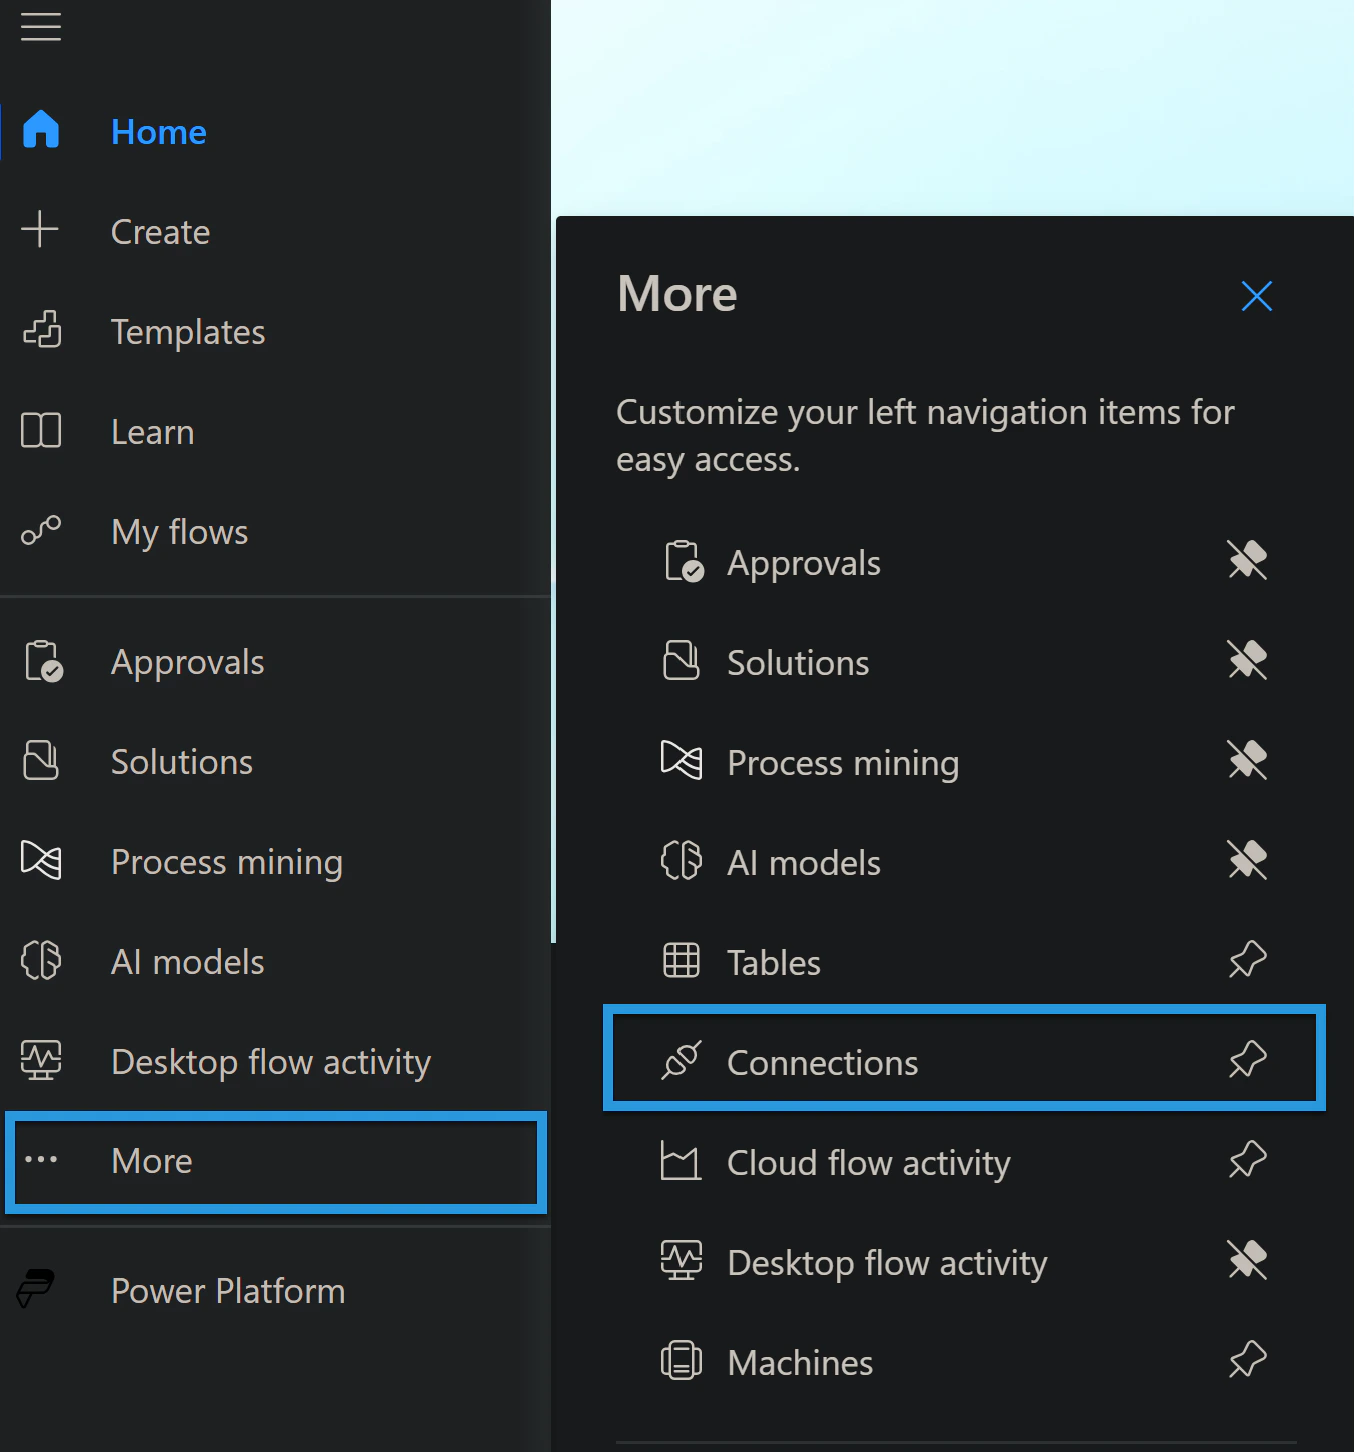
In the navigation menu, open **More** > **Connections**.
You can now build apps with your custom connector.
## Prerequisites for Connecting via Virtual SQL Server API
Before you connect via the Virtual SQL Server API, you must first do the following:
* Connect a data source to your Connect AI account. See [Sources](/en/Sources) for more information.
* If you want to connect to a Connect AI workspace, [add a workspace](/en/Workspaces#add-a-workspace) to Workspaces and [add assets](/en/Workspaces#workspace-assets) to your workspace.
* Generate a Personal Access Token (PAT) on the [Settings](/en/Settings#personal-access-tokens) page. Copy this down, as it acts as your password during authentication.
## Connect via the Virtual SQL Server API
To establish a connection from Microsoft Power Apps to the Connect AI Virtual SQL Server API, follow these steps.
Log in to Microsoft Power Apps.
In the navigation menu, open **More** > **Connections**.
 Click **New connection** to open the list of available connections.
Select **SQL Server**. In the dialog that appears, select **SQL Server Authentication**.
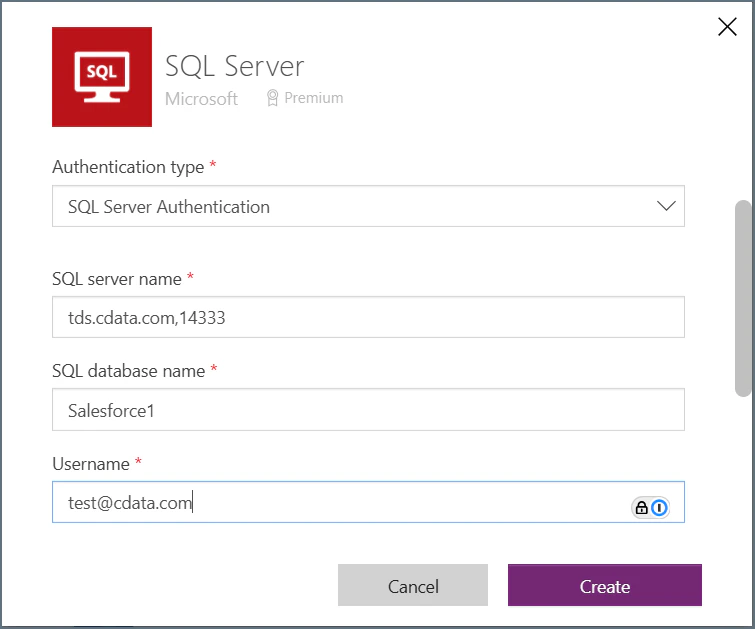
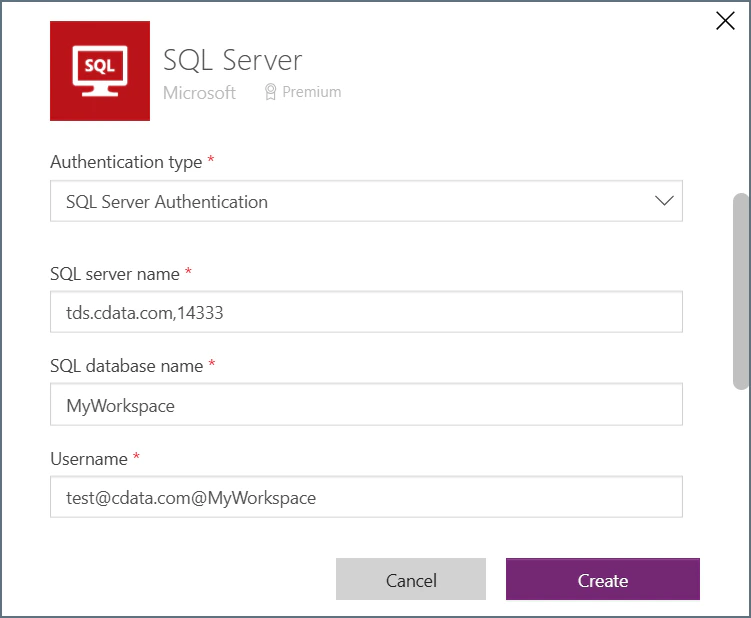
Enter the connection settings.
* **SQL server name**—enter the Virtual SQL Server endpoint and port separated by a comma: *tds.cdata.com*,*14333*
* **SQL database name**—enter the Connection Name of the Connect AI data source you want to connect to (for example, *Salesforce1*). To connect to a workspace, set the **SQL database name** to the name of your workspace (for example, *MyWorkspace*).
* **Username**—enter your Connect AI username. This is displayed in the top-right corner of the Connect AI interface. For example, *[test@cdata.com](mailto:test@cdata.com)*. To connect to a workspace, set the **Username** to `[CData_username]@[workspace_name]` (for example, *[test@cdata.com](mailto:test@cdata.com)@MyWorkspace*).
* **Password**—enter the PAT you generated on the [Settings](/en/Settings#personal-access-tokens) page.
* Leave the **Choose a gateway** field blank.
*Connecting to a source*:
Click **New connection** to open the list of available connections.
Select **SQL Server**. In the dialog that appears, select **SQL Server Authentication**.
Enter the connection settings.
* **SQL server name**—enter the Virtual SQL Server endpoint and port separated by a comma: *tds.cdata.com*,*14333*
* **SQL database name**—enter the Connection Name of the Connect AI data source you want to connect to (for example, *Salesforce1*). To connect to a workspace, set the **SQL database name** to the name of your workspace (for example, *MyWorkspace*).
* **Username**—enter your Connect AI username. This is displayed in the top-right corner of the Connect AI interface. For example, *[test@cdata.com](mailto:test@cdata.com)*. To connect to a workspace, set the **Username** to `[CData_username]@[workspace_name]` (for example, *[test@cdata.com](mailto:test@cdata.com)@MyWorkspace*).
* **Password**—enter the PAT you generated on the [Settings](/en/Settings#personal-access-tokens) page.
* Leave the **Choose a gateway** field blank.
*Connecting to a source*:
 *Connecting to a workspace*:
 Click **Create** to establish the connection.
Your connection now appears in your connection list. You can add more data sources from your Connect AI account by repeating this process and entering a different **SQL database name**.
You can preview your virtual table in Microsoft Power Apps only if you have an INTEGER column primary key in your table. Refer to the [Microsoft Power Apps documentation](https://learn.microsoft.com/en-us/power-apps/maker/data-platform/limits-tshoot-virtual-tables?tabs=sql) for details.
## Learn More
For more information about SQL Server connections in Microsoft Power Apps, please see [Microsoft’s support article](https://docs.microsoft.com/en-us/powerapps/maker/canvas-apps/connections/connection-azure-sqldatabase).
Click **Create** to establish the connection.
Your connection now appears in your connection list. You can add more data sources from your Connect AI account by repeating this process and entering a different **SQL database name**.
You can preview your virtual table in Microsoft Power Apps only if you have an INTEGER column primary key in your table. Refer to the [Microsoft Power Apps documentation](https://learn.microsoft.com/en-us/power-apps/maker/data-platform/limits-tshoot-virtual-tables?tabs=sql) for details.
## Learn More
For more information about SQL Server connections in Microsoft Power Apps, please see [Microsoft’s support article](https://docs.microsoft.com/en-us/powerapps/maker/canvas-apps/connections/connection-azure-sqldatabase).