> ## Documentation Index
> Fetch the complete documentation index at: https://docs.cloud.cdata.com/llms.txt
> Use this file to discover all available pages before exploring further.
# Google Sheets
> This page outlines the steps to install and configure the CData Connect Spreadsheets add-on for Google Sheets. After installation, Google Sheets is able to pull data from sources that you have connected to your CData Connect Spreadsheets account.
## Prerequisites
Before you can configure and use Google Sheets with Connect AI, you must first connect a data source to your Connect AI account. See [Sources](/en/Sources) for more information.
**Connect AI Customers Only:** You can also import Workspaces and Derived Views. To create a workspace, follow the instructions in [Workspaces](/en/Workspaces). To create a derived view (administrators only), follow the instructions in [Create a Derived View](/en/Data-Explorer#create-a-derived-view).
## Installation and Setup
Sign in to [Google Sheets](https://docs.google.com/spreadsheets/) and either open a spreadsheet or create a new spreadsheet.
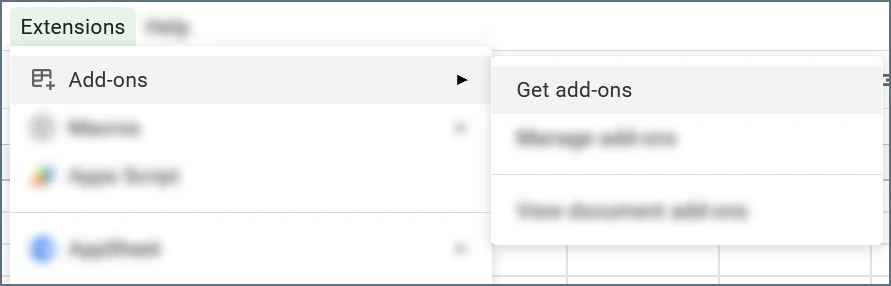
With a spreadsheet open, select **Extensions** > **Add-ons** > **Get add-ons**.
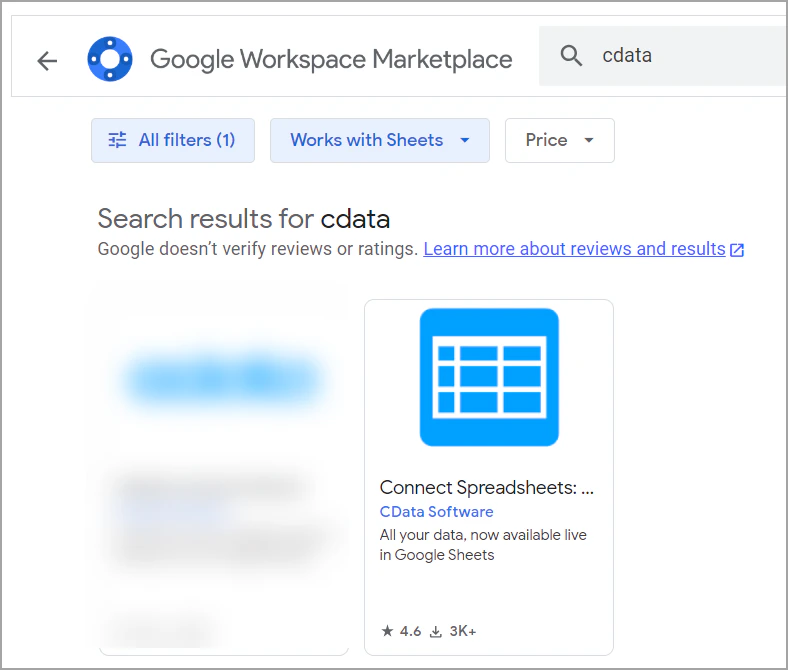
 Search for *CData* in the search bar and click the **CData Connect Spreadsheets** add-on.
 Click **Install** and then **Continue** on the pop-up.
Select your Google account and sign in if needed. When prompted to approve the connection, click **Allow**.
Return to the spreadsheet. Select **Extensions** > **CData Connect Spreadsheets** > **Open**.
The configuration pane appears to the right of your spreadsheet. Click **Authorize** to sign in to CData Connect Spreadsheets.
Enter your CData Connect Spreadsheets credentials and click **Continue**.
When a success message appears, close the tab and return to Google Sheets.
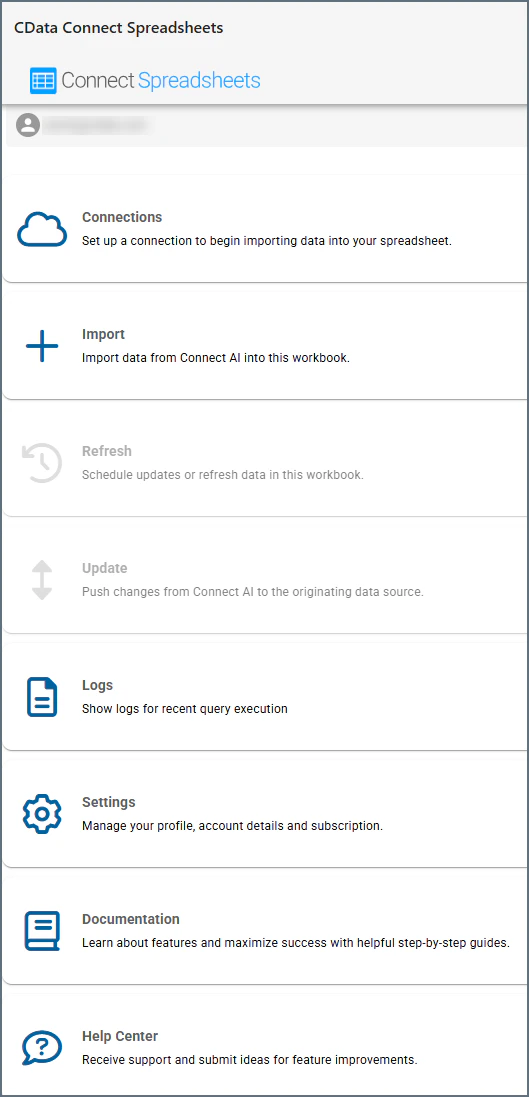
After you establish a connection, the CData Connect Spreadsheets navigation menu appears:
Click **Install** and then **Continue** on the pop-up.
Select your Google account and sign in if needed. When prompted to approve the connection, click **Allow**.
Return to the spreadsheet. Select **Extensions** > **CData Connect Spreadsheets** > **Open**.
The configuration pane appears to the right of your spreadsheet. Click **Authorize** to sign in to CData Connect Spreadsheets.
Enter your CData Connect Spreadsheets credentials and click **Continue**.
When a success message appears, close the tab and return to Google Sheets.
After you establish a connection, the CData Connect Spreadsheets navigation menu appears:
 ## Set Up Connection
If you do not yet have the data connection you need for CData Connect Spreadsheets, you need to set one up.
In the add-in pane, click **Connections**. Click **Add Connection**.
Select the connector for the data you want to connect to Google Sheets. Use the **Search** field to find the connector.
Enter your data connection settings by following the instructions on the connection page. Save and test your connection.
After you have a successful connection, you can [Import Data](#import-data).
You can also use the **Connections** option to edit existing connections.
## Import Data
To import data from a data connection, follow these steps:
Click **Import**.
Select an option from the drop-down menu: **Connections**, **Workspaces**, or **Derived Views**. Then follow the directions for the option you selected.
Only Connect AI customers can access workspaces and derived views.
### Import Connections
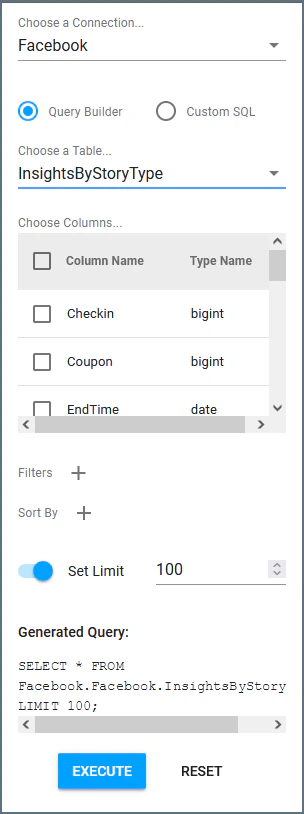
Select a **Connection** from the drop-down list.
Select either **Query Builder** or **Custom SQL**.
* For Query Builder, select a schema (if there are multiple schemas), table, and columns. If desired, you can also set [filters](#filters), [sorting options](#sorting), and limits. View the generated query and adjust if necessary.
* For Custom SQL, enter the SQL Statement in the provided field.
Click **Execute**.
## Set Up Connection
If you do not yet have the data connection you need for CData Connect Spreadsheets, you need to set one up.
In the add-in pane, click **Connections**. Click **Add Connection**.
Select the connector for the data you want to connect to Google Sheets. Use the **Search** field to find the connector.
Enter your data connection settings by following the instructions on the connection page. Save and test your connection.
After you have a successful connection, you can [Import Data](#import-data).
You can also use the **Connections** option to edit existing connections.
## Import Data
To import data from a data connection, follow these steps:
Click **Import**.
Select an option from the drop-down menu: **Connections**, **Workspaces**, or **Derived Views**. Then follow the directions for the option you selected.
Only Connect AI customers can access workspaces and derived views.
### Import Connections
Select a **Connection** from the drop-down list.
Select either **Query Builder** or **Custom SQL**.
* For Query Builder, select a schema (if there are multiple schemas), table, and columns. If desired, you can also set [filters](#filters), [sorting options](#sorting), and limits. View the generated query and adjust if necessary.
* For Custom SQL, enter the SQL Statement in the provided field.
Click **Execute**.
 When prompted, choose to output the data in either the current spreadsheet or a new one.
### Import [Workspaces](/en/Workspaces) (Connect AI Customers Only)
Select a workspace from the drop-down list.
Select either **Query Builder** or **Custom SQL**.
* For Query Builder, select a workspace and the columns to display. If desired, you can also set [filters](#filters), [sorting options](#sorting), and limits. View the generated query and adjust if necessary.
* For Custom SQL, enter the SQL Statement in the provided field.
Click **Execute**.
When prompted, choose to output the data in either the current spreadsheet or a new one.
### Import [Derived Views](/en/Data-Explorer#configure-derived-views) (Connect AI Customers Only)
Select either **Query Builder** or **Custom SQL**.
* For Query Builder, select a derived view and the columns to display. If desired, you can also set [filters](#filters), [sorting options](#sorting), and limits. View the generated query and adjust if necessary.
* For Custom SQL, enter the SQL Statement in the provided field.
Click **Execute**.
When prompted, choose to output the data in either the current spreadsheet or a new one.
## Refresh Data
To update the imported data in your spreadsheets from the originating source, click **Refresh** in the main menu of the CData Connect Spreadsheets add-on. (Click the back arrow to return to the main menu of the add-on, if necessary.) Then follow these steps:
Select the checkboxes next to the Google Sheets spreadsheets that you want to update.
When prompted, choose to output the data in either the current spreadsheet or a new one.
### Import [Workspaces](/en/Workspaces) (Connect AI Customers Only)
Select a workspace from the drop-down list.
Select either **Query Builder** or **Custom SQL**.
* For Query Builder, select a workspace and the columns to display. If desired, you can also set [filters](#filters), [sorting options](#sorting), and limits. View the generated query and adjust if necessary.
* For Custom SQL, enter the SQL Statement in the provided field.
Click **Execute**.
When prompted, choose to output the data in either the current spreadsheet or a new one.
### Import [Derived Views](/en/Data-Explorer#configure-derived-views) (Connect AI Customers Only)
Select either **Query Builder** or **Custom SQL**.
* For Query Builder, select a derived view and the columns to display. If desired, you can also set [filters](#filters), [sorting options](#sorting), and limits. View the generated query and adjust if necessary.
* For Custom SQL, enter the SQL Statement in the provided field.
Click **Execute**.
When prompted, choose to output the data in either the current spreadsheet or a new one.
## Refresh Data
To update the imported data in your spreadsheets from the originating source, click **Refresh** in the main menu of the CData Connect Spreadsheets add-on. (Click the back arrow to return to the main menu of the add-on, if necessary.) Then follow these steps:
Select the checkboxes next to the Google Sheets spreadsheets that you want to update.
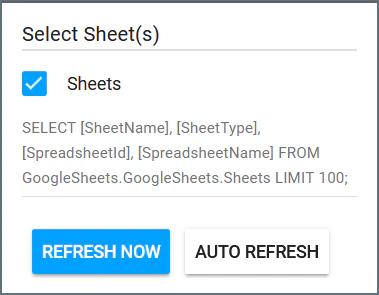 Select a refresh option:
* Click **Refresh Now** to manually refresh the data as soon as possible.
* Click **Auto Refresh** to open a dialog where you can select the auto-refresh interval in hours. Please note that this interval applies to all spreadsheets that use Auto Refresh.
The data in the selected Google Sheets spreadsheets update with new data.
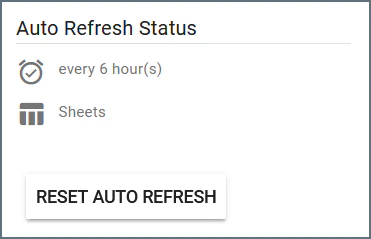
If Auto Refresh is selected, a new Auto Refresh Status field appears. It lists the refresh interval and the affected spreadsheets. A **Reset Auto Refresh** button allows you to stop the auto refresh and set up a new one.
Select a refresh option:
* Click **Refresh Now** to manually refresh the data as soon as possible.
* Click **Auto Refresh** to open a dialog where you can select the auto-refresh interval in hours. Please note that this interval applies to all spreadsheets that use Auto Refresh.
The data in the selected Google Sheets spreadsheets update with new data.
If Auto Refresh is selected, a new Auto Refresh Status field appears. It lists the refresh interval and the affected spreadsheets. A **Reset Auto Refresh** button allows you to stop the auto refresh and set up a new one.
 ## Update Data
You can push changes from the Google Sheets spreadsheet to the originating data connection. Note that in order to update a spreadsheet, the data must contain at least one primary key. You must also have the proper permissions to update the source data. You cannot update read-only fields in the originating data connection.
Be sure to update your data frequently if you are using the auto refresh feature, or your changes may be overwritten by the originating data connection.
CData Connect Spreadsheets does not support updates for views (only tables).
To update data in your spreadsheet, follow these steps:
Make your changes to the Google Sheets spreadsheet. When you update data, the data is highlighted in red to signify that it is not yet updated to the originating data connection.
If you want to update only select rows, highlight the cells or rows to be updated.
On the **CData Connect Spreadsheets** add-on pane, click **Update**.
Determine whether you want to **Update Selected** rows or **Update All**.
Click **Execute**. Click **Confirm** to continue. This action updates the originating data connection and cannot be undone.
CData Connect Spreadsheets returns a message whether the update was successful. If unsuccessful, CData Connect Spreadsheets displays the reason the update failed.
If the update is successful, the data in red turns black. This indicates that the data is updated in the originating data connection.
## Insert Data
To insert a row or rows in a spreadsheet, follow these steps:
If necessary, return to the main menu of the CData Connect Spreadsheets add-on.
Use the Google Sheets function to insert rows in your spreadsheet (**Insert** > **Rows**).
Enter the information into the row or rows. When you add data, the data is highlighted in red to signify that it is not yet updated to the originating data connection.
If you want to update only the inserted row(s), highlight the row(s).
On the **CData Connect Spreadsheets** add-on pane, click **Update**.
Determine whether you want to **Update Selected** rows or **Update All**.
Click **Execute**. Click **Confirm** to continue. This action inserts the data into the originating data connection and cannot be undone.
CData Connect Spreadsheets returns a message whether the insertion was successful. If unsuccessful, CData Connect Spreadsheets displays the reason the insertion failed.
If the insertion is successful, the data in red turns black. This indicates that the data is updated in the originating data connection.
## Delete Data
CData Connect Spreadsheets does not support deletion for views (only tables).
To delete rows from a spreadsheet, follow these steps:
If necessary, return to the main menu of the CData Connect Spreadsheets add-on.
Select the rows you want to delete and click **Delete**. You can select any cell(s) in the row and CData Connect Spreadsheets deletes the entire row. CData Connect Spreadsheets prompts if you are sure you want to delete the given number of rows.
Click **Confirm** to continue with the deletion. CData Connect Spreadsheets displays whether it deleted the rows successfully.
You cannot undo the row deletion.
## Logs
Click **Logs** to open a dialog that lists the most recent queries, including:
* The time and date they occurred
* Their results (success or failure)
* The contents and parameters of the queries
See [Logs](/en/Logs) for more information.
## Advanced Query Settings
When importing data, you can use [Filters](#filters) and [Sorting](#sorting) to build your query.
### Filters
To add a filter, click the **+** next to the **Filters** header. You can add more filters by clicking the **+** again, and you can delete a filter by clicking the trash can icon next to it.
## Update Data
You can push changes from the Google Sheets spreadsheet to the originating data connection. Note that in order to update a spreadsheet, the data must contain at least one primary key. You must also have the proper permissions to update the source data. You cannot update read-only fields in the originating data connection.
Be sure to update your data frequently if you are using the auto refresh feature, or your changes may be overwritten by the originating data connection.
CData Connect Spreadsheets does not support updates for views (only tables).
To update data in your spreadsheet, follow these steps:
Make your changes to the Google Sheets spreadsheet. When you update data, the data is highlighted in red to signify that it is not yet updated to the originating data connection.
If you want to update only select rows, highlight the cells or rows to be updated.
On the **CData Connect Spreadsheets** add-on pane, click **Update**.
Determine whether you want to **Update Selected** rows or **Update All**.
Click **Execute**. Click **Confirm** to continue. This action updates the originating data connection and cannot be undone.
CData Connect Spreadsheets returns a message whether the update was successful. If unsuccessful, CData Connect Spreadsheets displays the reason the update failed.
If the update is successful, the data in red turns black. This indicates that the data is updated in the originating data connection.
## Insert Data
To insert a row or rows in a spreadsheet, follow these steps:
If necessary, return to the main menu of the CData Connect Spreadsheets add-on.
Use the Google Sheets function to insert rows in your spreadsheet (**Insert** > **Rows**).
Enter the information into the row or rows. When you add data, the data is highlighted in red to signify that it is not yet updated to the originating data connection.
If you want to update only the inserted row(s), highlight the row(s).
On the **CData Connect Spreadsheets** add-on pane, click **Update**.
Determine whether you want to **Update Selected** rows or **Update All**.
Click **Execute**. Click **Confirm** to continue. This action inserts the data into the originating data connection and cannot be undone.
CData Connect Spreadsheets returns a message whether the insertion was successful. If unsuccessful, CData Connect Spreadsheets displays the reason the insertion failed.
If the insertion is successful, the data in red turns black. This indicates that the data is updated in the originating data connection.
## Delete Data
CData Connect Spreadsheets does not support deletion for views (only tables).
To delete rows from a spreadsheet, follow these steps:
If necessary, return to the main menu of the CData Connect Spreadsheets add-on.
Select the rows you want to delete and click **Delete**. You can select any cell(s) in the row and CData Connect Spreadsheets deletes the entire row. CData Connect Spreadsheets prompts if you are sure you want to delete the given number of rows.
Click **Confirm** to continue with the deletion. CData Connect Spreadsheets displays whether it deleted the rows successfully.
You cannot undo the row deletion.
## Logs
Click **Logs** to open a dialog that lists the most recent queries, including:
* The time and date they occurred
* Their results (success or failure)
* The contents and parameters of the queries
See [Logs](/en/Logs) for more information.
## Advanced Query Settings
When importing data, you can use [Filters](#filters) and [Sorting](#sorting) to build your query.
### Filters
To add a filter, click the **+** next to the **Filters** header. You can add more filters by clicking the **+** again, and you can delete a filter by clicking the trash can icon next to it.
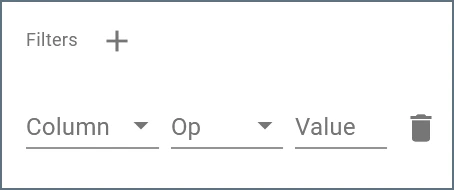 Each filter has three fields to fill out:
* **Column**—select the column from your table that you want to filter.
* **Op**—the operation the filter performs. Options are *equals*, *does not equal*, *contains*, *does not contain*, *less than*, *less than or equal to*, *greater than*, and *greater than or equal to*.
* **Value**—the value for the filter operation.
For example, if you wanted to retrieve AccountValues above \$100,000, you might set the Column to *AccountValues*, the Op to *greater than*, and the Value to *100,000*. Then, when you execute the query, only results matching this filter will be returned.
As you enter your filter parameters, the **Generated Query** at the bottom of the pane automatically updates.
### Sorting
To add a sorting rule to your query results, click the **+** next to the **Sort By** header. You can add more sorting rules by clicking the **+** again, and you can delete a sorting rule by clicking the trash can icon next to it.
Each filter has three fields to fill out:
* **Column**—select the column from your table that you want to filter.
* **Op**—the operation the filter performs. Options are *equals*, *does not equal*, *contains*, *does not contain*, *less than*, *less than or equal to*, *greater than*, and *greater than or equal to*.
* **Value**—the value for the filter operation.
For example, if you wanted to retrieve AccountValues above \$100,000, you might set the Column to *AccountValues*, the Op to *greater than*, and the Value to *100,000*. Then, when you execute the query, only results matching this filter will be returned.
As you enter your filter parameters, the **Generated Query** at the bottom of the pane automatically updates.
### Sorting
To add a sorting rule to your query results, click the **+** next to the **Sort By** header. You can add more sorting rules by clicking the **+** again, and you can delete a sorting rule by clicking the trash can icon next to it.
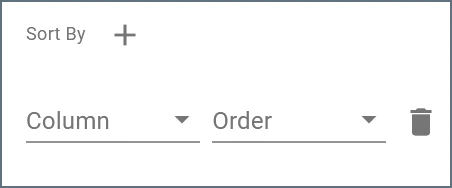 Each sorting rule requires a **Column** and a sorting **Order** (ascending or descending). If you add multiple sorting rules, the results are sorted in the order that the rules appear. The query gives highest sorting priority to the first rule, then the second rule, etc.
As you enter your sorting parameters, the **Generated Query** at the bottom of the pane automatically updates.
Each sorting rule requires a **Column** and a sorting **Order** (ascending or descending). If you add multiple sorting rules, the results are sorted in the order that the rules appear. The query gives highest sorting priority to the first rule, then the second rule, etc.
As you enter your sorting parameters, the **Generated Query** at the bottom of the pane automatically updates.