> ## Documentation Index
> Fetch the complete documentation index at: https://docs.cloud.cdata.com/llms.txt
> Use this file to discover all available pages before exploring further.
# ADO.NET
> This page outlines the steps that are required to use the Microsoft ADO.NET data provider for Connect AI.
## Prerequisites
Before you can configure and use ADO.NET with Connect AI, you must first connect a data source to your Connect AI account. See [Sources](/en/Sources) for more information.
## Install the Provider
Follow these steps to download and install the provider:
[Download](https://www.cdata.com/download/getfile.aspx?file=free/LFRK-A/setup.exe\&name=ADO.NET%20Provider%20for%20CData%20Connect\&tag=Download-ado) and run the ADO.NET setup file.
The installer can automatically detect software that supports ADO.NET, such as Visual Studio. Select the options that you want the installer to configure.
After installation, the ADO.NET Provider will be available in the software that you selected during installation.
## Connect to Connect AI
Connect AI uses OAuth to establish a connection between the ADO.NET Provider and your account. The steps below provide an example of configuring the ADO.NET Provider in Visual Studio 2022:
In Visual Studio, click **Tools** > **Connect to Database**.
Select **CData Connect Data Source** as your Data Source.
In the **Data Provider** drop-down menu, select **ADO.NET Provider for CData Connect 2021** and click **Continue**.
The **Add Connection** window appears. In the **Auth Scheme** field, select **OAuth**. Do not fill out other fields.
Click **Test Connection**.
* If you are already logged in, a success message appears.
* If you are not logged in, the Connect AI sign-in window opens in your web browser. Sign in and return to Visual Studio.
Click **OK** on the success message and **OK** in the **Add Connection** window.
Your connection appears in the **Server Explorer** pane under the **Data Connections** section.
## Connect to a Workspace
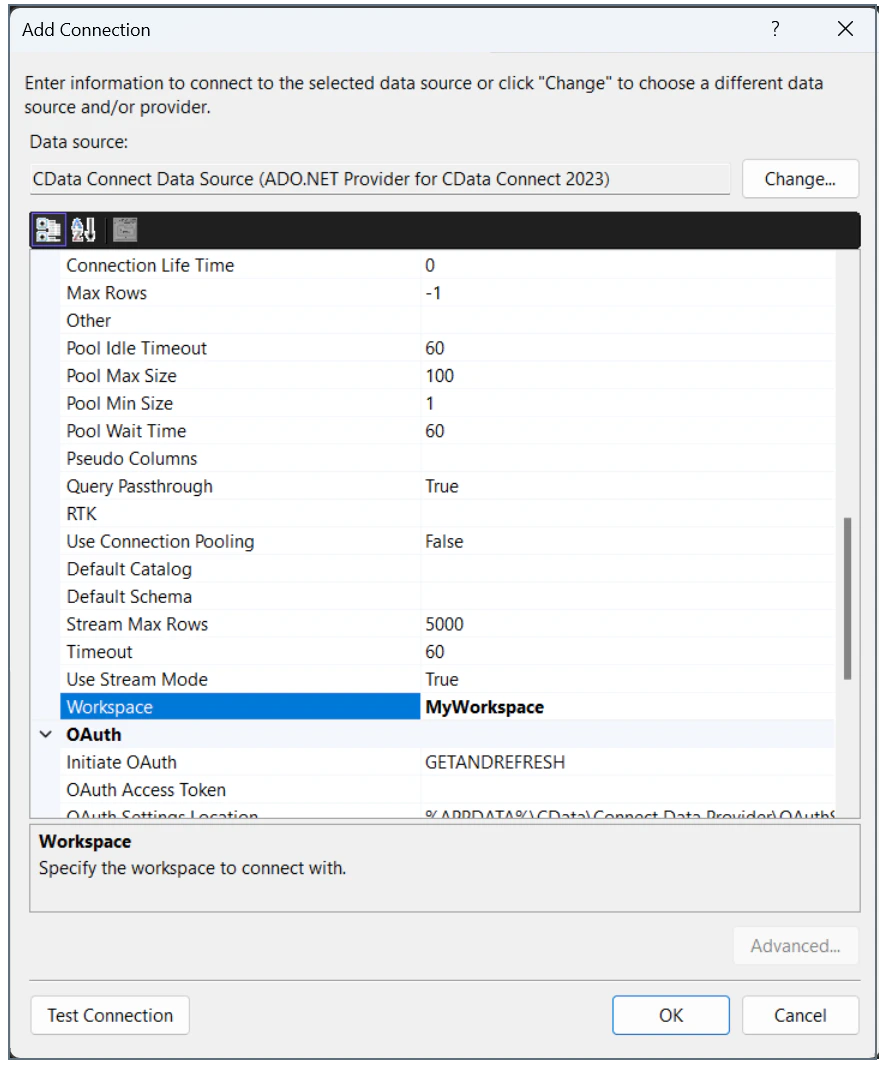
To connect the ADO client to a specific [workspace](/en/Workspaces), you specify the workspace name in the **Workspace** field of the **Add Connection** window.
 ## Learn More
To learn more information about using the ADO.NET Provider for Connect AI, click [here](https://cdn.cdata.com/help/LFM/ado/default.htm).
## Learn More
To learn more information about using the ADO.NET Provider for Connect AI, click [here](https://cdn.cdata.com/help/LFM/ado/default.htm).